Multi-sites navigation toolbar aka navbar
Say you have a bunch of services that you maintain for your beloved users. As time goes, the amount of available services becomes too much for everyone to remember where to find what.
Ideally you have a catalogue and a documentation in a wiki somewhere which contains all the precious links. This is all well, but could it be even more direct?
We need a navbar
How about implementing a navigation bar to access all your services like Framasoft full-fledged navbar?
The sources for the navbar are available on their gitlab repository. However, there is a lot in there, and I soon realised I would never be able to figure how to hack things to adapt it for my meagre needs.
So, following the CHATONS forum (in French), I started working with arn-nav, a much simplified version, simple enough for me to, if not fully understand, adapt to my needs.
The navigation bar was working on basic and handmade websites, but clashing violently with materialize.css or bootstrap css rules. I ended up renaming several classes, and adding a lot more rules to prevent unwanted overwriting behaviours from the applications’ native styles.
No support included
Before going any further, please know that tuning those rules took me literally hours, with many fixes for one app bringing regressions on others.
So, what I am promoting and sharing here comes ‘as is’ under GPLv3 licence, and I won’t have the time (nor the skills) to look into any issues you may encounter while implementing this navigation bar.
One thing is for sure: it will not be a one size fits all, unfortunately (I gave up on Tiny Tiny RSS integration for example).
Sharing is caring
I am sufficiently satisfied with the results and improvements to share what I’ve done, though I have no doubt there is plenty of room for improvements.
The steps below will explain how to prepare and implement your own navigation bar. We will use the examples of Framadate and Privatebin to show how to adapt an existing application to display the banner correctly.
Sources and Ansible role
The sources for the navigation bar are available here under GPLv3.
We have also gathered the different changes we made for all of our applications and added them to the repository in an ansible directory. This should be particularly handy if you are using Ansible (otherwise, it may still spare you some time looking for the right file to edit).
Howto
Prepare your menu
I recommend to use a YAML file that will be converted into JSON later on. It will make writing and editing the menu content much easier. In our case we will be using the jsonify filter available in Jekyll.
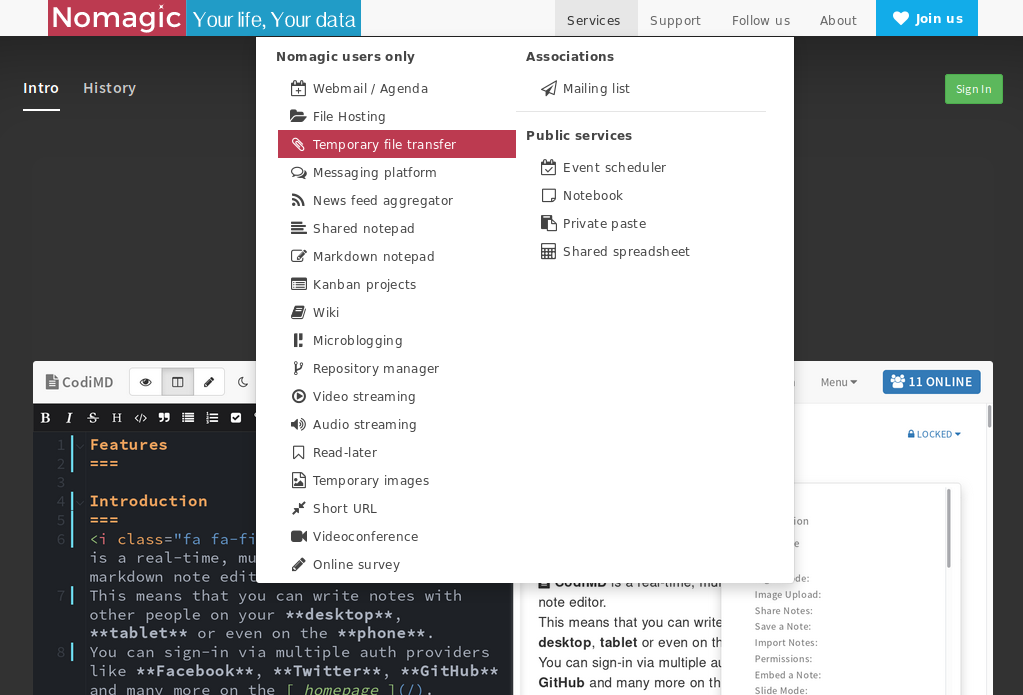
Let’s take the example of Nomagic navbar, which I’ve shortened for this article. The link and image keys are used to customise the navbar to your own entity.
---
style: default
group: public
title: Nomagic
link: https://nomagic.uk
image: https://nomagic.uk/assets/img/nomagic_mob1.svg
tree:
- title: Services
  category: right
  class: navcol-2
  tree:
  - title: Nomagic users only
    link: https://nomagic.uk/plans/
    short_description: Your life, Your data
    description: Nomagic is an informal entity which aims to provide private individuals and small associations with a viable, responsible, and committed alternative to the Web services provided by big IT corporations.
    position: right
    tree:
    - title: Webmail / Agenda
      icon: fa-calendar-plus-o
      link: https://webmail.nomagic.uk
    - title: Markdown notepad
      icon: fa-pencil-square-o
      link: https://codimd.nomagic.uk
    - title: Kanban projects
      icon: fa-list-alt
      link: https://task.nomagic.uk
    - title: Wiki
      icon: fa-book
      link: https://wiki.nomagic.uk
  - divider: true
  - title: Associations
    link: https://nomagic.uk/plans/
    short_description: Hosting association
    description: We are keen on helping small associations to get away from GAFAM. Please contact us to discuss the feasibility and costs.
    position: left
    tree:
    - title: Mailing list
      icon: fa-send-o
      link: https://sympa.nomagic.uk

- title: Support
  category: right
  tree:
  - title: Documentation
    icon: fa-book
    link: https://wiki.nomagic.uk
  - title: Getting help
    icon: fa-handshake-o
    link: https://nomagic.uk/support/

- title: Follow us
  category: right
  class: navcol-2
  tree:
  - title: RSS Feeds
    short_description: Our RSS feeds
    description: Add our RSS feed to your favourite RSS aggregator. Nomagic provides one such service to its users.
    link: '#'
    position: right
    tree:
    - title: Nomagic news
      link: https://nomagic.uk/feed.xml
      icon: fa-feed
    - title: FOSS-notes blog
      link: https://foss-notes.blog.nomagic.uk/feed/
      icon: fa-feed
  - title: On federated platforms
    short_description: Our presence on social networks
    description: Nomagic is only present on decentralised & federated platforms. You won't find us on Facebook or Twitter.
    link: '#'
    position: left
    tree:
    - title: Fediverse
      icon: fa-pleroma
      link: https://social.nomagic.uk/contact
    - title: Diaspora
      icon: fa-diaspora
      link: https://joindiaspora.com/people/87faea600e61013584800242ac110007

- title: About
  category: right
  tree:
  - title: Contact us
    icon: fa-envelope-o
    link: https://nomagic.uk/contact/
  - title: About Nomagic
    icon: fa-group
    link: https://nomagic.uk/about/
  - title: Terms of Service
    icon: fa-legal
    link: https://nomagic.uk/tos/
- title: Join us
  icon: fa-heart
  link: https://nomagic.uk/plans/
  category: right
  class: primary
...
Since we are using Jekyll, we are using the jsonify liquid filter to convert our YAML file to JSON during the website build, using:
---
layout: none
permalink: /third_party/simple-nav/nav.json
---
{{ site.data.navbar | jsonify }}
So, in our case, the JSON file containing all of our menu is available at the sub-URL /third_party/simple-nav/nav.json.
The bottom line here is: you need to have a JSON file named nav.json ready.
Hoist the colors
We don’t offer a lot of customisation, but you can adapt some of the colors to your taste by editing nav.css variables:
#menu_ynh_container {
    /* [..] */
    --navbar-text: #333;
    --navbar-submenu-link-hover: #F94A96;
    --navbar-submenu-primary: #444;
    --navbar-submenu-secondary: #555;
    --navbar-join: #12ACE9;
    --navbar-join-hover: #BC3A50;
    --navbar-menu-link-hover: #eee;
    --navbar-menu-bg: #F8F8F8;
}
Pointing to the right URL
Modify the very first line of nav.js to point at the place where you are hosting all of the navbar components:
var ynh_url = 'https://nomagic.uk/third_party/simple-nav/';Time to implement…!
Implementing the navbar to your web applications
Like a breeze…
If you are in luck, the web application will ‘accept’ the navbar easily and seamlessly. For example, on Framadate here is what we have to do:
- Insert a call to
nav.jsat the bottom of the html body intpl/page.tpl:<script type="text/javascript" src="https://nomagic.uk/third_party/simple-nav/nav.js"></script> </body> </html>Easy enough!
When you don’t know
Sometimes you will encounter webapps that you know nothing about the framework or languages used underneath, and it will become a challenge to figure out where and how to make your changes. Time to leverage the power of FOSS communities in this cases!
For example, I reached out to the Wallabag community as I was scratching my head to figure out where would be a good place to insert my Javascript script call. Once I knew what to change, and whether it required any additional steps, I was ready to implement the navbar.
Eventually this is what we had to do to implement the navigation toolbar to our Wallabag instance:
- Insert a javascript call to
nav.jsinsrc/Wallabag/CoreBundle/Resources/views/themes/material/layout.html.twig:
{% block scripts %}
    <script src="https://nomagic.uk/third_party/simple-nav/nav.js"></script>
    {{ parent() }}
    <script src="{{ asset('wallassets/material' ~ (app.debug ? '.dev' : '') ~ '.js') }}"></script>
{% endblock %}- Remove the cache dir for twig on my Wallabag server.
- Add CSS content to avoid content clashing between Wallabag top bar and the navbar, in
web/wallassets/material.css:#slide-out{top:37px;}
As you can see, adapting the navbar will require a bit of elbow grease, and can turn into a very bad experience. My advice on this is:
- do not overwrite anything (back up any file you change)
- use an automation tool to implement your changes. It will also be super-handy to re-apply any customisation you set after an application upgrade
- thoroughly test your implementations, as some things may break (ex: pdf viewer on Seafile)
- if it’s too much trouble, reach out to the project team for help if needed (always worth a try)
- there is no shame in giving up on implementing the navbar for a specific webapp. Even if it can be considered fairly light-touch, we are meddling with things that were not always designed to adapt easily to our needs and desires.